Understanding Battery Basics and Theory
How Do Ebike Battery Packs Work?
At the heart of every e-bike battery is the lithium-ion cell. The most common format is the 18650 cylinder, though larger 21700 cells are gaining popularity. Understanding the voltage characteristics of a single cell is the first step in designing your pack.
- Nominal Voltage: This is the “average” voltage of the cell, typically 3.6V or 3.7V. When you see a “36V” or “48V” battery, this number is calculated using the nominal voltage.
- Maximum Voltage: When fully charged, a standard lithium-ion cell reaches 4.2V. Overcharging beyond this point is dangerous.
- Cutoff Voltage: This is the point where the battery is considered “empty.” While cells can technically go down to 2.5V, most systems cut off around 3.0V or 3.2V to prolong the life of the cells.
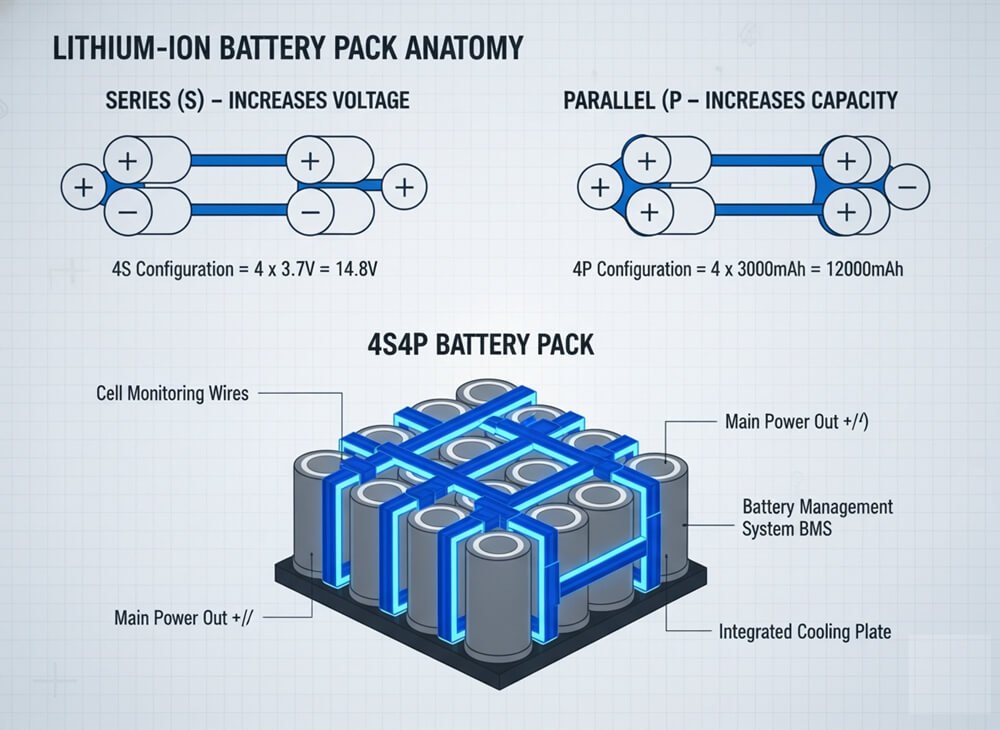
To build a useful battery, individual cells must be connected in specific patterns to achieve the desired power. This is done using Series and Parallel connections:
- Series (S): Connecting the positive terminal of one cell to the negative terminal of the next increases voltage. For example, connecting 10 cells in series (10S) creates a nominal 36V battery (10 x 3.6V). For a 52V battery, you would need 14 cells in series (14S), and for a high-power 72V system, you would need 20 cells (20S).
- Parallel (P): Connecting positive to positive and negative to negative increases capacity (measured in Amp-Hours or Ah) and the ability to deliver current (Amps). If you connect four cells in parallel (4P), you get four times the capacity and four times the current capability of a single cell, while the voltage stays the same.
How to Calculate Your Battery Configuration
Designing your pack starts with a little math. You need to know your target voltage and target capacity. The formula is straightforward:
- Series Count: Target Voltage / 3.6V
- Parallel Count: Target Amp Hours / Cell Capacity
Let’s say you want to build a 52V battery with a capacity of roughly 25Ah, using cells that have a capacity of 3200mAh (3.2Ah).
- Series: 52V / 3.6V is roughly 14.4, so you would choose a 14S configuration.
- Parallel: 25Ah / 3.2Ah is roughly 7.8, so you would round up to an 8P configuration.
This means your final battery pack would be a “14S 8P” battery. To find the total number of cells needed, simply multiply the series count by the parallel count: 14 x 8 = 112 cells.
What Are the Best Cells for DIY Ebike Batteries?
Choosing the right cell is critical. You generally have a trade-off between high capacity (longer range) and high power (faster acceleration).
Cell Sizes
While the 18650 (18mm wide, 65mm long) has been the standard for over a decade, the 21700 (21mm wide, 70mm long) is becoming the new favorite. It offers higher energy density, meaning you need fewer cells to reach the same capacity. There are also larger formats like the 32650, often used in LiFePO4 builds, which are great for stationary storage but can be bulky for bikes.
Capacity vs. Discharge Current
You need to pick a cell that can handle the current your e-bike motor requires. If you have a high-power motor, you need “high power” cells. If you have a standard commuter bike, “high capacity” cells are a better choice for range.
| Cell Type | Model Examples | Typical Capacity | Max Continuous Discharge | Best For |
|---|---|---|---|---|
| High Capacity | Panasonic 18650PF, Sanyo 18650GA, Samsung 35E | 2900mAh – 3500mAh | 8A – 10A | Long-range commuting, low-power motors |
| High Power | Samsung 30Q, Molicel P42A, Sony VTC6 | 3000mAh – 4200mAh | 15A – 45A | Racing, off-road, high-performance motors |
Buyer Beware: The market is flooded with fake cells. Avoid buying from random sellers on eBay or Amazon. Stick to reputable suppliers like 18650BatteryStore, LiionWholesale, or trusted vendors on AliExpress with a proven track record. A fake cell not only has poor performance but can be a significant safety hazard.
Essential Tools and Materials
What Tools Do I Need to Build a Lithium Battery?
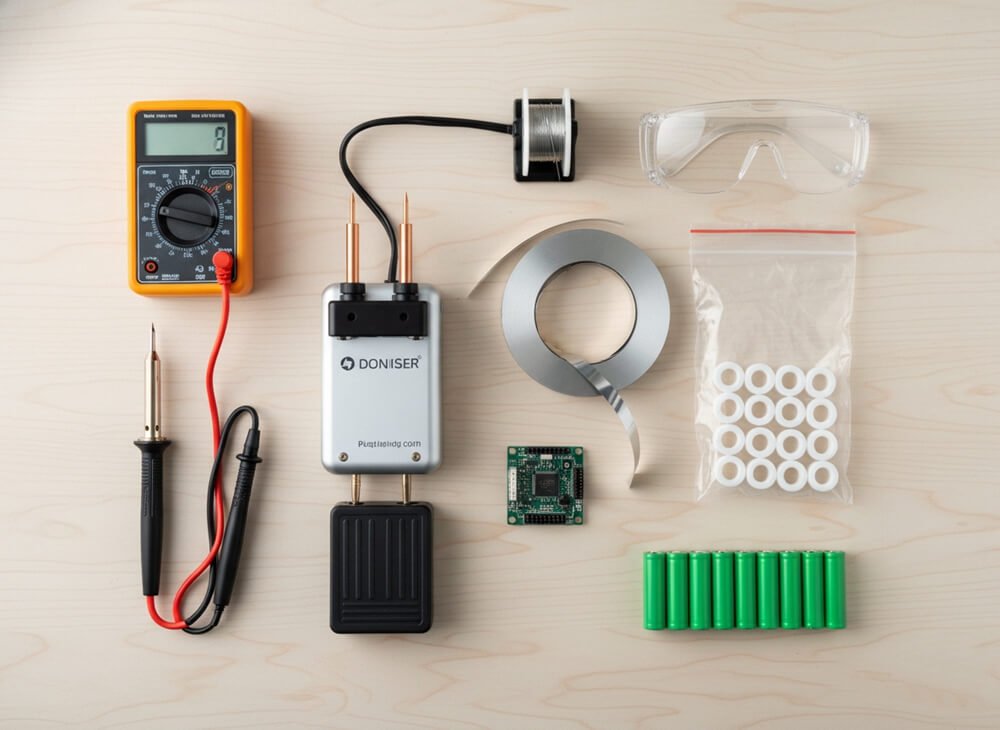
Building a battery isn’t something you can do with just a screwdriver. You need specific tools to ensure the connections are solid and the cells aren’t damaged.
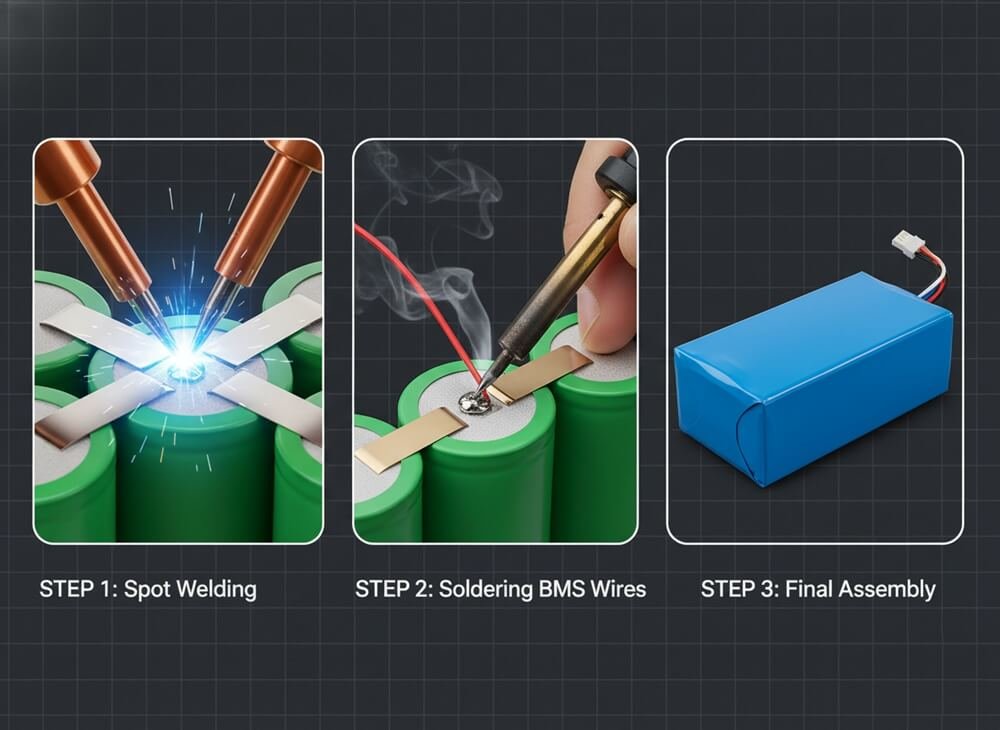
Spot Welder
This is the most important tool. Never solder directly to the battery cells. Soldering irons apply too much heat for too long, which can damage the internal chemistry of the cell and melt the safety seals. A spot welder uses a quick, high-current pulse to fuse the nickel strip to the battery terminal in milliseconds, keeping the cell cool.
Popular models for DIYers include:
- kWeld: A high-end enthusiast favorite known for immense power and precision. It requires a separate high-current power source (like a large lead-acid battery).
- Sunkko 709 Series: A benchtop unit that plugs into the wall. It’s decent for thinner nickel strips but can struggle with 0.2mm pure nickel.
- Glitter 811H: A capacitor-based welder that is gaining popularity for its strong welds and ease of use.
Soldering Iron
While you don’t solder the cells, you do need to solder the BMS wires and heavy discharge connectors. A standard 40W iron won’t cut it. You need a high-power soldering iron (100W or more) with a large tip to quickly heat up the thick wires and nickel strips without transferring heat for too long.
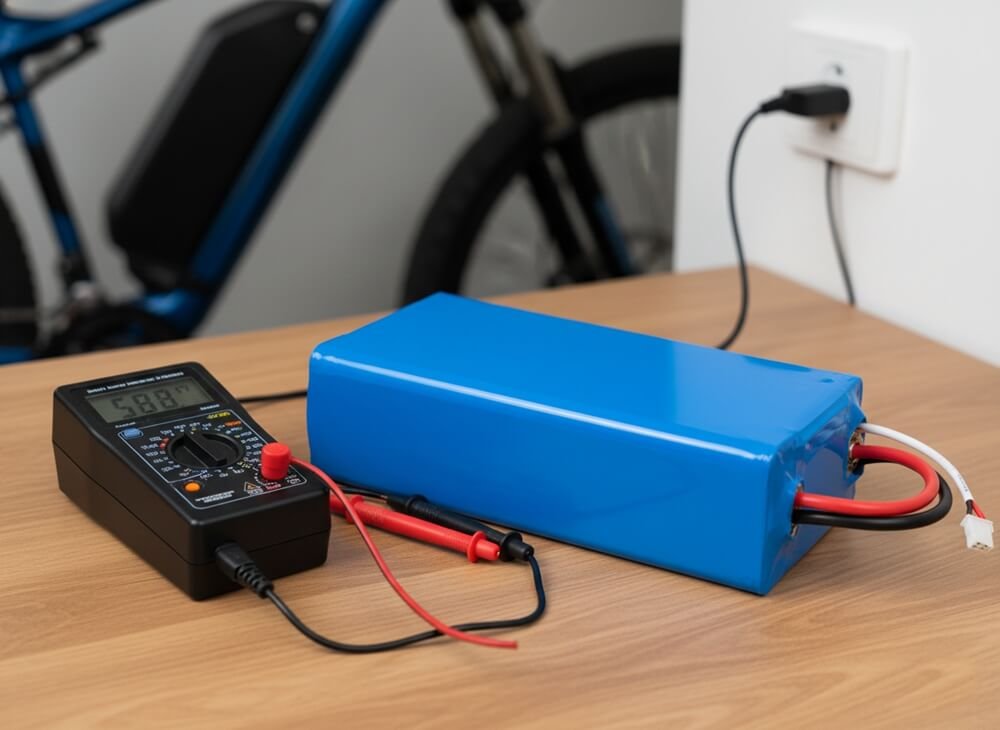
Multimeter
A basic digital multimeter is essential for checking the voltage of individual cells before assembly and verifying the final pack voltage. It’s your primary safety diagnostic tool.
What Materials Are Required?
Beyond the cells, you need the “glue” that holds the pack together electrically and physically.
Nickel Strips: Pure Nickel vs. Nickel-Plated Steel
This is where many beginners make a mistake. Nickel strips connect your cells. There are two main types available:
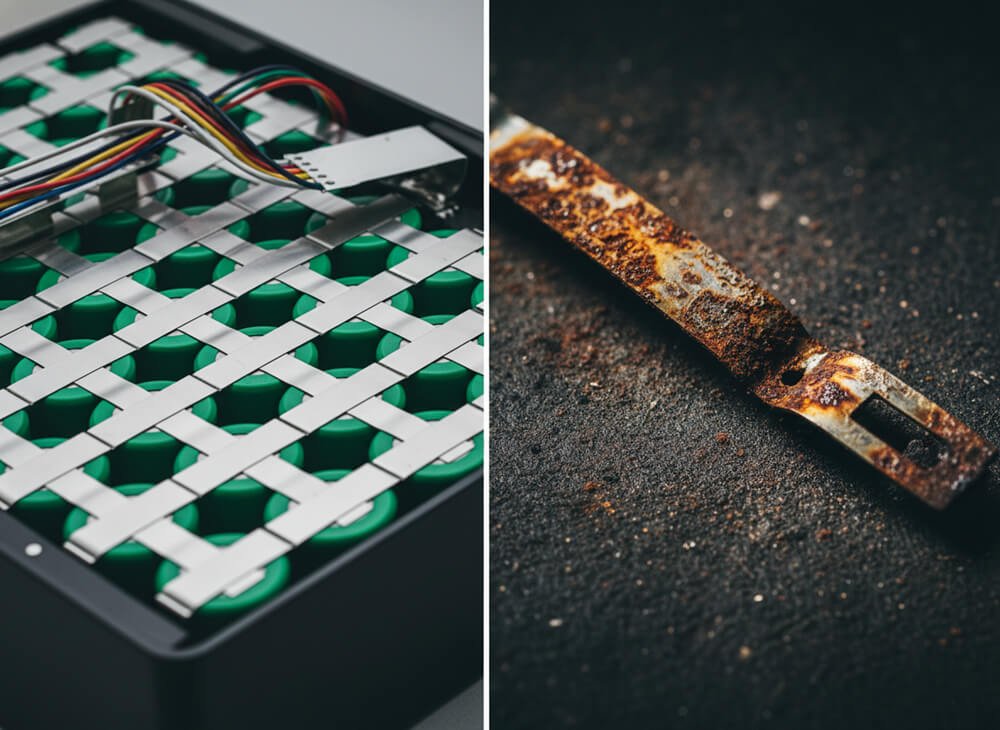
- Pure Nickel: Highly conductive and corrosion-resistant. This is what you want for e-bikes to reduce heat and voltage sag.
- Nickel-Plated Steel: Steel is cheaper but has much higher resistance. It heats up under high load and can rust if scratched. It’s fine for flashlights but bad for vehicle traction batteries.
How to Verify: Do the “Saltwater Test.” Scratch a sample strip and leave it in saltwater for 24 hours. If it rusts, it’s steel. Alternatively, try the “Spark Test” with a Dremel tool: Pure nickel produces almost no sparks, while steel throws a shower of bright yellow sparks.
Battery Holders (Spacers)
Plastic cell holders are crucial for safety. They maintain a consistent air gap between cells, preventing them from touching and shorting out due to vibration. They also provide structural rigidity. You can choose a standard square grid layout for simplicity or a honeycomb (offset) layout to pack cells more densely into tight spaces.
Battery Management System (BMS)
The BMS is the brain of your battery. It protects the pack from overcharging, over-discharging, and short circuits. You must pick a BMS that matches your series count (e.g., 14S) and can handle your motor’s current (e.g., 40A continuous).
- Dumb BMS: Set at the factory, simple, reliable, and cheap.
- Smart (Bluetooth) BMS: Allows you to monitor individual cell voltages, temperature, and current via a phone app. Great for troubleshooting and peace of mind.
Designing the Layout and Nickel Strip Sizing
How to Arrange Battery Cells for Safety?
Before you weld a single strip, you need a plan. The physical layout of your cells determines how easy the pack is to build and how safe it will be.
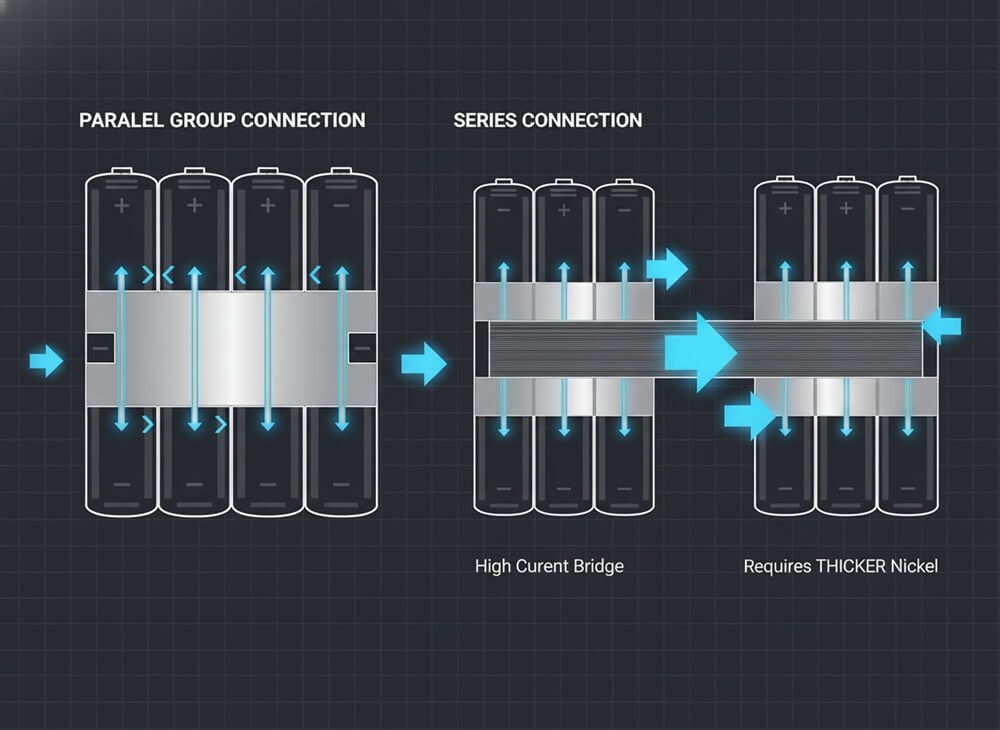
The standard practice is to group your parallel (P) cells together first. For example, if you are building a 14S 5P pack, you will have 14 groups, each containing 5 cells. Within each group of 5, all the positive ends face the same way.
Then, you connect these groups in series. This means the positive end of Group 1 connects to the negative end of Group 2. To facilitate this, you typically flip every other group. Group 1 faces up, Group 2 faces down, Group 3 faces up, and so on. This allows you to use short, straight nickel bridges between them.
What Size Nickel Strip Should I Use?
This is the most critical engineering decision in the build. If your strips are too thin, they will act like a resistor, getting hot, wasting energy, and potentially melting the battery wrapper.
Current capability depends on the cross-sectional area of the strip. Here are some general rules of thumb for Pure Nickel strips:
- 0.15mm x 8mm strip: Can handle approximately 5-7 Amps continuously.
- 0.20mm x 10mm strip: Can handle approximately 10-14 Amps continuously.
The Series Bridge Calculation: The parallel connections only handle small balancing currents, so thin strips are fine. However, the series connections between groups must carry the entire current of the battery pack. If your e-bike controller draws 40 Amps, your series connections must be able to handle 40 Amps.
If a single strip handles 5 Amps and you need 40 Amps, you would need 8 strips connecting the groups. Often, there isn’t enough room for 8 separate strips. This leads builders to use layering (stacking strips on top of each other) or using a wide sheet of nickel that covers the entire group.
Copper vs. Nickel for High Power?
For extremely high-power builds (like performance motorcycles or drones), even thick nickel isn’t conductive enough. Some advanced builders use the “Copper Sandwich“ method.
Copper is about four times more conductive than nickel but is very hard to spot weld because it dissipates heat too fast. To get around this, builders place a copper strip on the battery, then place a nickel strip on top of the copper. The spot welder heats the nickel, which traps the heat long enough to fuse the copper to the battery terminal beneath it. This gives you the conductivity of copper with the weldability of nickel.
Step-by-Step Assembly Guide
Step 1: Voltage Matching and Cell Preparation
Before you assemble anything, check the voltage of every single cell. They must all be within 0.05V of each other (e.g., all between 3.60V and 3.65V). If you weld a fully charged cell to a dead cell, massive current will flow instantly, causing sparks, heat, and potential damage.
Once checked, apply adhesive insulation rings (often called “barley paper”) to the positive terminal of every cell. The positive terminal sits very close to the negative casing edge under the plastic wrap. These rings provide a crucial second layer of protection against short circuits.
Step 2: Spot Welding the Pack
Insert your cells into the plastic holders according to your layout plan. Double-check the polarity! Now, set up your spot welder.
The Tear Test: Do not start on your battery. Take a spare/dead cell or a piece of metal and test a weld. Pull the nickel strip off with pliers. A good weld should rip holes in the nickel strip, leaving metal stuck to the battery. If the strip pops off cleanly, your weld is too weak—increase the power.
Welding Pattern:
- Weld the Parallel Groups: Connect all the positives in Group 1 together, and all the negatives together. Repeat for all groups.
- Weld the Series Connections: Connect the Positive of Group 1 to the Negative of Group 2. Ensure you use enough layers of nickel to handle the total current.
Pro Tip: Use slotted nickel strips. The slot forces the welding current to travel down into the battery terminal rather than just across the top of the strip, resulting in a much stronger weld.
Step 3: Installing the BMS
The BMS has three main connections: B- (Battery Negative), P- (Discharge Negative), and C- (Charge Negative). Note: Some common-port BMS units combine P- and C-.
- Solder the thick B- wire from the BMS to the main negative terminal of your battery pack.
- Connect the thin balance wires. These sense the voltage of each group. Start with the black wire at the main negative, then the first red wire to the positive of Group 1, the second to Group 2, and so on.
- Crucial Safety Step: Do NOT plug the balance connector into the BMS while you are soldering. Solder all the wires to the battery first, then check the voltages at the connector pin with a multimeter to ensure they go up in sequence (e.g., 3.6V, 7.2V, 10.8V…). Only plug it in once you are 100% sure the wiring is correct.
If your BMS has temperature sensors, tape them deep inside the middle of the pack where it gets the hottest.
Step 4: Power Connectors and Final Wiring
Solder your discharge connector (like an XT60 or XT90) to the main positive and P- wires. Use high-quality silicone wire (10AWG or 12AWG) that can handle the heat and flexibility required.
When soldering thick wires to the nickel tabs on the battery, be quick. You don’t want heat traveling into the cells. It helps to add a glob of solder to the nickel strip first (tinning it), and then fuse the wire to it. Placing a wet rag or heat sink nearby can help protect the cells.
Finishing and Testing
How to Insulate and Wrap the Battery?
A naked battery is a bomb waiting to happen. You must armor it against vibration and shorts. Cover the entire pack in sheets of “fish paper” (a tough, electrical insulating cardboard). Pay special attention to corners where nickel strips might rub.
Add a layer of foam padding to absorb shocks from riding. Finally, slide the entire assembly into a large diameter heat shrink tube. Use a heat gun to shrink it down for a tight, professional finish. Seal the ends with hot glue or silicone to make it water-resistant.
Testing the Battery Pack
Before you put it on your bike, verify the total voltage. It should match your expected nominal voltage. Connect your charger. The light should turn red (charging) and the voltage should slowly rise. Leave it until the BMS cuts off the charge at 4.2V per cell (e.g., 58.8V for a 14S pack).
If you have a Smart BMS, open the app and check that all cell groups are balanced within 0.01V – 0.03V. If one group is significantly lower, you may have a bad cell or a weak weld connection.
Troubleshooting Common Issues
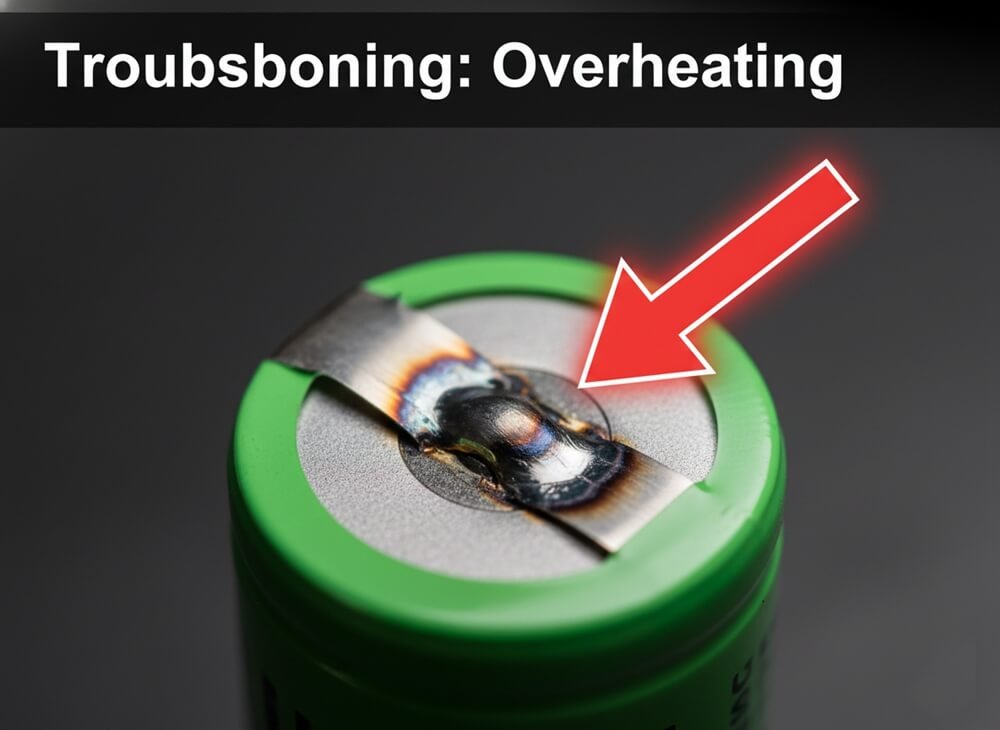
Why Is My Battery Overheating?
If your battery gets hot during use, it’s a sign of high resistance. This usually means your nickel strips are too thin for the current you are drawing. The only fix is to open the pack and reinforce the series connections by welding additional layers of nickel strip on top.
How to Fix Poor Welds?
If you find a loose strip, do not try to solder it back on; soldering heat will destroy the cell. You must re-spot weld it. If your welder is weak, try charging the welder fully, shortening the welding leads, or sharpening the electrode tips. Cleaning the battery terminal and nickel strip with alcohol can also improve conductivity for the weld.
Short Circuits and Safety
If you smell a sweet chemical smell or hear hissing, a cell has vented. Move the battery outside immediately to a fire-safe area (like a concrete driveway). Do not breathe the fumes. Prevention is key: always use spacers, always use insulation rings, and never rush the build.
Frequently Asked Questions (FAQ)
No. You should never mix cells of different capacities, chemistries, or ages. Even mixing the same brand from different batches can lead to imbalance. The weaker cells will drain faster, triggering the BMS to shut off the whole pack early, ruining the performance of the good cells.
It depends. For standard small batteries, buying mass-produced ones is often cheaper. However, for high-capacity or high-power custom batteries, DIY can save you 30-50% while allowing you to use higher quality cells than most generic pre-built packs.
A well-built pack using quality name-brand cells (Samsung, LG, Panasonic) can last 3-5 years or 500-1000 charge cycles. To extend life, try not to charge it to 100% or drain it to 0% every time; keeping it between 20% and 80% can double its lifespan.
Install a fuse on the discharge wire that is slightly higher than your max load but lower than the wire’s limit. For example, if your controller draws 30A, a 40A fuse is a good choice to prevent catastrophic shorts without blowing during normal riding spikes.
Yes, you can solder nickel strip to nickel strip (for example, bridging two series groups). Just avoid soldering directly onto the battery cell terminal itself. Solder the strips together away from the battery, or weld them to the battery first before soldering wires to the strip.
Conclusion: Powering Your Ride with Confidence
Building your own e-bike battery is one of the most rewarding projects for a DIY enthusiast. It demystifies the “magic black box” that powers your ride and gives you the freedom to create a system with range and power that off-the-shelf products simply can’t match. By understanding the basics of series and parallel connections, respecting the power of lithium-ion, and using the right materials, you can build a professional-grade energy source.
However, the success of your build relies heavily on the quality of your foundation—specifically, your connection materials. Using inferior nickel strips is like putting bicycle tires on a race car; it simply won’t hold up. To ensure your hard work lasts, always source certified, pure materials that can handle the current you demand.
If you are ready to start your build, don’t gamble with generic marketplace strips. We supply factory-direct, high-purity nickel strips and custom-cut interconnects designed specifically for high-performance battery packs. Check our stock to find the perfect fit for your next project.